Gray Jet Media

  • Web
    • Authorize.Net
    • Content Management System
  • About
    • Testimonials
    • Pricing
  • Contact
  • Clients
You are here: Home / Archives for Behind the Scenes

Unifi 6.0.28 and Remote User VPN Configuration

November 5, 2020 by Russ Williams 2 Comments

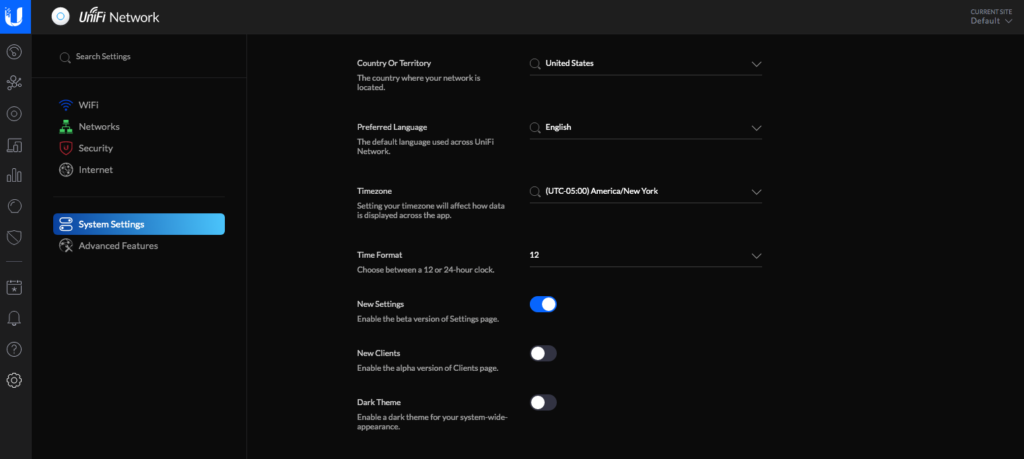
Chances are if you have a fairly robust network setup, you’ll likely want to allow remote users to VPN into the network for access to internal resources at some point. We utilize Ubiquiti equipment exclusively and recently upgraded our network to the 6.x.x branch and were trying to configure a VPN setup with no success. We tried almost everything under the sun, but it appeared that our network consistently was rejecting the credentials of our remote users. Luckily, we found the fix, and it was frustratingly simple; revert to the previous settings GUI. It looks like the new GUI doesn’t properly enable the RADIUS server when turning it on. The other frustrating part is that you can’t simply flip the switch after you’ve already tried to enable the RADIUS server. You have to actually create a Site and migrate to the new site or start with a new controller build. We didn’t test if you could disable the RADIUS server, create a system backup, then restore that backup to a new controller install, but instead opted to start with a clean controller install, revert to the previous menu GUI, then enable the RADIUS server and we had no issues. If you are on the 6.x.x brand and your using the new GUI, it can be disabled by going to System Settings > New Settings and turning the switch off. But remember, if you already tried to enable the RADIUS server, then you’ll have to create a new site as Ubiquiti describes here, revert to the old GUI, enable the RADIUS server, move your devices to the new site, and operate off of that new site and delete the old one. Hopefully that will help someone who is beating their head against a wall like we were.

The Remote VPN setup is the same as this article describes and essentially involves the following steps:

  1. Create a new network with a different IP/subnet that your other LAN/VLANs as Remote User, L2TP and select your RADIUS profile
  2. Ensure you are on the old settings GUI
  3. Turn on the RADIUS server
  4. Add a user to the RADIUS server as L2TP and IPv4
  5. Enjoy your functioning Remote User VPN setup on Unifi 6.x.x

Filed Under: Behind the Scenes Tagged With: 6.0.28, 6.x.x, ubiquiti, unifi

Recovering lost “On My Mac” local mailboxes after OS X 10.11 El Capitan Upgrade

April 1, 2016 by Russ Williams 19 Comments

I am usually pretty slow to upgrade our business systems to a new operating system until there is a good track record of compatibility and to ensure all of our workflows remain uninterrupted.  We finally got around to upgrading to OS X 10.11 El Capitan and ran into an issue where all of my local “On My Mac” mailboxes in Apple Mail didn’t seem to make the transition from 10.10 to 10.11.  Taking a peak into the file structure at “~/Users/username/Library/Mail” it was apparent all of my local folders were still there, it was just a matter of how to get them imported into Mail painlessly.  I’ll present the solution we found.  I’m sure there is more than one way to accomplish this and I actually just ran across the “Import Mailbox” solution from within Mail, so there is a good change that may work as well.

Once El Capitan completed the upgrade process within Mail, it created new alphanumeric folders for each of the old accounts in lieu of the previous naming conventions such as “IMAP-emailusername@domainname.com@mailserver.domainname.com”.  What I didn’t realize is that is also apparently created a new alphanumeric folder that would store the local mailboxes where as previous versions of Apple Mail stored all local folders inside of a folder here “~/Users/username/Library/Mail/V3” called “Mailboxes”.  The process was pretty straightforward:

  1. Create a unique local mailbox from within Mail and select “On My Mac” from the dropdown called something along the lines of “TheBestTestingFolderEver”
    MailStep1
  2. Quit Mail.
  3. Do a search for the name of the previously created mailbox within “~/Users/username/Library/Mail/V3” or drill down the folders until you find which one is storing that mailbox.  Right click and select “Show in Enclosing Folder” and note the alphanumeric title at the top of the window if you are doing the search.
    Mail Step 2
  4. Once you have the alphanumeric folder identified that stores all of the local mailboxes, move all of the mailboxes that were currently under the “Mailboxes” over to the newly created alphanumeric folder.
  5. Then navigate to “~/Users/username/Library/Mail/V3/MailData” and delete all 3 files that begin with “Envelope”.  These are the index files that are used to provide references to all of the mailboxes used within Mail.  If you are hesitant to delete them, just drag them to the desktop in case you make a mistake and would like the original files.
    Mail Step 3
  6. Open Mail and allow it to re-index all of your mailboxes.
    Mail Step 4

Hopefully someone can benefit from this.  Enjoy!

Filed Under: Behind the Scenes Tagged With: 10.11, apple, Folder, Local, Lost, mail, On My Mac

Gmail, Apple Mail 6.5, and OS X 10.8.4 …

July 30, 2013 by Russ Williams Leave a Comment

I just recently had an issue with Apple Mail and Gmail where Mail would indicate that my properly configured IMAP account constantly error’ed out with the error ” ” as shown below.

Gmail Error

I was racking my brain around why this wasn’t working.  I could telnet into imap.gmail.com so I knew it wasn’t an issue with a firewall or DNS issue.  After scouring the web, I cam across a solution.  Instead of “imap.gmail.com” use “IMAP.gmail.com”.  Go figure.

Setup when it was not working

Setup when it was not working


Correction made to the IMAP server case

Correction made to the IMAP server case

Filed Under: Behind the Scenes Tagged With: gmail osx mail imap

Aperture 3 – How to find your Referenced or Managed Files

March 25, 2011 by Russ Williams Leave a Comment

If you’ve read my post on why Managed Masters are bad and referenced Masters are good and you are taking the time to convert your library over to Referenced, you might like to determine which files are still Managed.

Luckily with Aperture 3 it’s easy to determine the status of a photo using the Smart Album.


SmartAlbumManaged
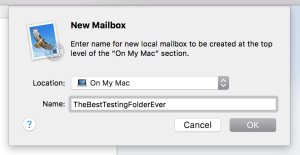
Simply create a new Smart Album and select “Add Rule” and select the “File Status” rule.  From there you can select whether you want the Smart Album to include Managed or Referenced files.  Close the Rules and name your Smart Album something useful such as “Managed Files” and you can instantly see which files are still managed or Referenced.


Filed Under: Behind the Scenes Tagged With: album, aperture 3, files, managed, master, referenced, smart

Aperture 3 – File/Volume/Drive Fragmentation

March 25, 2011 by Russ Williams Leave a Comment

If you were not following my previous post, I got very frustrated one day over the slow performance of Aperture 3.  I highlighted several reasons why, if you haven’t already, you should switch to Referenced Masters over Managed.  Moving on, let’s discuss how fragmentation plays into Aperture performance.

Don’t let your harddrive fill up past 60-70% of it’s capacity. Aperture libraries will always fragment to some extent.  It’s the simple matter of an application writing to a disk, finding free space on the harddrive to store additional files and save changes.  When the harddrive has more free space it’s easier to find a spot to store files and write changes.  As the harddrive loses free space it’s harder to find free space and takes more time and effort to do so, thus slowing Aperture down.

Always work from a freshly formatted volume. As you continue working with an Aperture library, it will continue to fragment over and over again.  Once you copy the Aperture library to another harddrive, it essentially defragments the file, filling the largest space on the harddrive before filing the rest of the data in any free space it can find.  If you start with a freshly formatted harddrive and then copy the Aperture library to that drive, it will start filling up space from the beginning and should have little to no fragmentation.  This will make Aperture work less (well your hardware will work less anyway) and should increase the speed and efficiency of Aperture.

If you can’t/don’t want to always work from a freshly formatted volume, defrag. Since working from a freshly formatted volume essentially will help with fragmentation, the second best solution would be to use a program such as Tech Tool Deluxe or iDefrag to defrag the volume or Aperture library.

Picture are worth a thousand words …

Before

Before

After

After

Filed Under: Behind the Scenes

Aperture 3 – Managed or Referenced Masters?

March 25, 2011 by Russ Williams 8 Comments

Let me start by saying we are a 100% Apple outfit.  We love our Macs and Aperture is no exception.  When it came time to decide between Aperture and Lightroom, the choice after spending some time with both was obvious; one is made by Apple and the other is made by the same company who thinks Flash is stable on a Mac.  I digress.

I started noticing that my Aperture library was really starting to slow down, almost to the point of wanting to pull my hair out, and this is working on a dual quad-core Mac Pro running at 2.8GHz.  This led me to start doing some research.  This first post will focus on Managed vs. Referenced files in regards to storing your Master files in Aperture.  My next post will deal with Library/File/Volume fragmentation and what the best strategy is to avoid having your Aperture library become fragmented, thus slowing it down.

A little background
We use Aperture almost exclusively to store, edit and process all of the photos that we shoot.  We, of course, shoot all our images in RAW, usually with a Canon 5D Mark II and as a result each of our files is typically ~30MB each.  Up to this point, I’ve allowed Aperture to manage all of our files which has generated a singular Aperture library that exceeds 500GB.  There are several reasons why this was a bad approach and I honestly just didn’t take the time to think it through when I initially setup Aperture (I think I was just too excited to get started).

So why is Managed bad?

  1. Data isn’t segregated.  If you lose a harddrive or the Aperture library becomes corrupted for whatever reason, there is a good chance you could lose not only revisions (Versions) but possibly your Masters as well.  This clearly isn’t good.  By utilizing a Referenced setup, you can effectively store your Aperture Library on one volume and your Master files on another.  This gives you much greater flexibility and also much greater protection.
  2. Backups take forever. This is primarily due to the file fragmentation which I’ll touch on in the next post.  Try copying a heavily fragmented file that’s over 500GB and you’ll quickly see that you don’t have 6 hours to sit and let it do it’s magic.

Possible Solutions
(Arranged in order of Safety and assuming you are using a non-expandable system such as an iMac, Macbook Air/Pro, etc.)

  1. If you don’t want to deal with external harddrives on a constant basis you could essentially use your internal harddrive but simply partition it into 3 partitions.  One for your installation of OS X, one for the Aperture library and one for your Master files.  The only catch, is that you’d need to ensure you don’t fill any of the partitions more than 60-70% with files (more on the following post dealing with fragmentation).
  2. Use an External Harddrive in the same manner as the internal except using 2 partitions, one for the library and one for the master files.
  3. Use an External harddrive for your Master files and keep the Aperture library on your internal harddrive.  This will allow for good data segregation and also make it easier to backup both your Master files and library as there should be less fragmentation to deal with (Once again, more in the next post).
  4. Use 2 external harddrives.  One would contain your Aperture library and the other would contain your master files.  This is probably the safest option as you have 3 independent drives allowing for more redundancy.

What I didn’t address was having an external RAID setup which would be the ideal solution so that you are constantly having backups made of both your Masters and library, but really when you start getting into it there are a lot of solutions you could come up with.

The main point here is to use Referenced Masters, not managed.

Filed Under: Behind the Scenes Tagged With: 5d, aperture, canon, managed, mark II, masters, optimization, raw, referenced

Recent Posts

  • Unifi 6.0.28 and Remote User VPN Configuration
  • Lantern and Compass Nonprofit
  • Sam’s Excavating
  • iRock Ministries
  • Funkstown, MD

Our location

We are located in Smithsburg, MD but specialize in deploying solutions for customers all across the globe.

Start a Project

We’d love to hear about your upcoming project and how we can help. Tell us all about it by filling out our contact form.

Or, give us a call at +1 857 301 7878

Connect with us

Want to keep up with what's happening at Gray Jet Media? Follow us across the social networks.
  • Facebook
  • Twitter

Return to top of page

Copyright © 2025 · Gray Jet Media · The Fine Print · Log in